4_화면 구성
| topics | |
| types | |
| tags |
#android #ui #view #layout #xml
|
| references |
Android UI 구성
Android에서 화면을 구성하는 방법을 정리한다.
기본 개념
- 화면은 Activity로 구성한다
- 모든 앱에 화면이 있는 건 아니다 (백그라운드 앱도 있음)
- 화면과 Activity가 1:1 대응되는 건 아니다
- Fragment나 Compose를 사용하면 하나의 Activity에서 여러 화면 가능
화면 구성 방법
1. Kotlin 코드로 구현
import android.graphics.Typeface
import androidx.appcompat.app.AppCompatActivity
import android.os.Bundle
import android.view.Gravity
import android.view.ViewGroup.LayoutParams.WRAP_CONTENT
import android.widget.ImageView
import android.widget.LinearLayout
import android.widget.TextView
import androidx.core.content.ContextCompat

class MainActivity : AppCompatActivity() {
    override fun onCreate(savedInstanceState: Bundle?) {
        super.onCreate(savedInstanceState)

        // TextView 생성
        val name = TextView(this).apply {
            typeface = Typeface.DEFAULT_BOLD
            text = "Lake Louise"
        }

        // ImageView 생성
        val image = ImageView(this).also {
            it.setImageDrawable(ContextCompat.getDrawable(this, R.drawable.lake_1))
        }

        // 또 다른 TextView
        val address = TextView(this).apply {
            typeface = Typeface.DEFAULT_BOLD
            text = "Lake Louise, AB, 캐나다"
        }

        // LinearLayout으로 묶기
        val layout = LinearLayout(this).apply {
            orientation = LinearLayout.VERTICAL
            gravity = Gravity.CENTER
            addView(name, WRAP_CONTENT, WRAP_CONTENT)
            addView(image, WRAP_CONTENT, WRAP_CONTENT)
            addView(address, WRAP_CONTENT, WRAP_CONTENT)
        }

        setContentView(layout)
    }
}
apply vs also:
apply는this로 접근,also는it으로 접근한다. 마지막 인자가 람다면 소괄호 밖으로 뺄 수 있다.
2. XML로 구현 (권장)
<?xml version="1.0" encoding="utf-8"?>
<LinearLayout xmlns:android="http://schemas.android.com/apk/res/android"
    android:layout_width="match_parent"
    android:layout_height="match_parent"
    android:orientation="vertical"
    android:gravity="center">

    <TextView
        android:layout_width="wrap_content"
        android:layout_height="wrap_content"
        android:textStyle="bold"
        android:text="Lake Louise" />

    <ImageView
        android:layout_width="wrap_content"
        android:layout_height="wrap_content"
        android:src="@drawable/lake_1" />

    <TextView
        android:layout_width="wrap_content"
        android:layout_height="wrap_content"
        android:textStyle="bold"
        android:text="Lake Louise, AB, 캐나다" />
</LinearLayout>
Activity에서 연결:
setContentView(R.layout.activity_main)
왜 XML을 쓰냐면: UI 코드와 로직 코드가 분리되어 가독성이 좋다. 디자이너와 협업도 쉽다.
View 클래스 구조

| 클래스 | 설명 |
|---|---|
View |
모든 뷰의 최상위 클래스 |
ViewGroup |
다른 뷰를 묶어서 제어 (레이아웃 담당) |
TextView |
텍스트 출력 |
ImageView |
이미지 출력 |
Button |
버튼 |
EditText |
텍스트 입력 |
참고: Activity는 View의 서브클래스만 화면에 출력할 수 있다.
ViewGroup (레이아웃)
| 레이아웃 | 설명 |
|---|---|
LinearLayout |
선형 배치 (Flutter의 Row/Column) |
RelativeLayout |
상대적 배치 |
FrameLayout |
단일 뷰 또는 뷰 겹치기 |
GridLayout |
행/열 기반 정렬 |
ConstraintLayout |
복잡한 UI (권장) |
<!-- LinearLayout 예시 -->
<LinearLayout
    android:orientation="vertical"
    android:gravity="center">
    <!-- 자식 뷰들 -->
</LinearLayout>
주요 속성
기본 속성
| 속성 | 설명 | 예시 |
|---|---|---|
id |
뷰 식별자 | @+id/myView |
layout_width |
너비 | match_parent, wrap_content, 100dp |
layout_height |
높이 | match_parent, wrap_content, 100dp |
layout_margin |
외부 여백 | 16dp |
padding |
내부 여백 | 8dp |
ID 사용법
<TextView
    android:id="@+id/textName"
    android:layout_width="wrap_content"
    android:layout_height="wrap_content" />
// 기존 방식
val textView = findViewById<TextView>(R.id.textName)

// ViewBinding (권장)
// build.gradle에서 viewBinding.isEnabled = true 설정 필요
val binding = ActivityMainBinding.inflate(layoutInflater)
binding.textName.text = "Hello"
왜 ViewBinding을 쓰냐면: 타입 안전하고, null 체크가 필요 없다.
findViewById는 실수하면 런타임에 터진다.
크기 관련
| 값 | 설명 |
|---|---|
match_parent |
부모 크기에 맞춤 |
wrap_content |
내용 크기에 맞춤 |
layout_weight |
남은 공간 비율로 채움 (Flutter의 Expanded) |
<!-- weight 예시: 1:2 비율 -->
<LinearLayout android:orientation="horizontal">
    <View android:layout_weight="1" android:layout_width="0dp" />
    <View android:layout_weight="2" android:layout_width="0dp" />
</LinearLayout>
visibility
| 값 | 설명 |
|---|---|
visible |
보임 |
invisible |
안 보이지만 자리 차지 |
gone |
안 보이고 자리도 안 차지 |
텍스트 관련
| 속성 | 설명 |
|---|---|
text |
출력할 문자열 |
textColor |
글자 색상 |
textSize |
글자 크기 (sp 권장) |
textStyle |
bold, italic, normal |
maxLines |
최대 줄 수 |
ellipsize |
초과 시 ... 위치 (start, middle, end) |
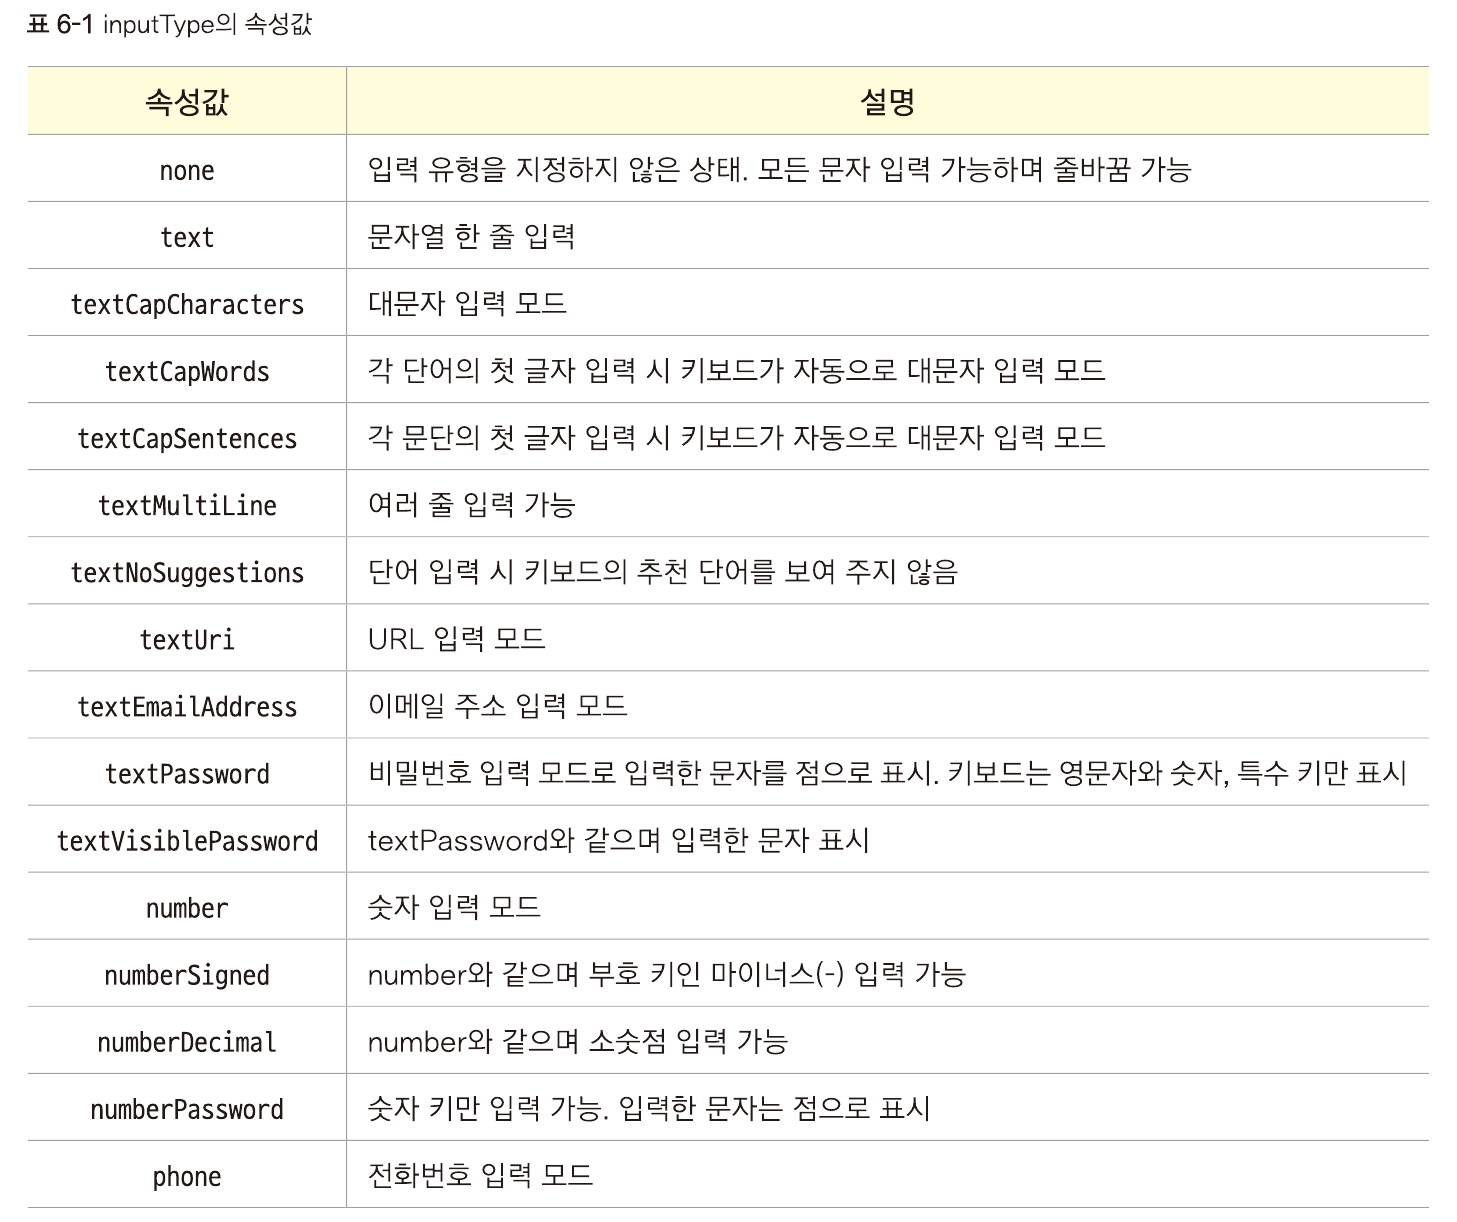
inputType |
EditText 입력 타입 (phone, text 등) |
<TextView
    android:text="Hello World"
    android:textColor="@color/black"
    android:textSize="16sp"
    android:textStyle="bold"
    android:maxLines="2"
    android:ellipsize="end" />
단위 비교
| 단위 | 설명 |
|---|---|
px |
픽셀 (비권장) |
dp |
밀도 독립적 픽셀 (레이아웃에 사용) |
sp |
확장 가능한 픽셀 (텍스트에 사용, 사용자 설정 반영) |
왜 sp를 쓰냐면: 사용자가 시스템 설정에서 글꼴 크기를 변경하면 sp로 지정한 텍스트도 같이 커진다. 접근성을 위해 텍스트는 sp를 쓴다.
관련 문서
- 2_안드로이드 이해 - Android 아키텍처
- 3_코틀린 - Kotlin 기초
- 5_미래 - Jetpack Compose